I still remember the first time I made these chocolate crinkle cookies. It was 7 PM on a Tuesday, my kids were complaining that they were “hangry,” and I was staring into a pantry that felt dangerously empty. I had a bag of flour, some sugar, a stick of butter, cocoa powder, and a box of cake mix. I thought, surely I could make something sweet with just that.
Turns out, I could. And it was amazing.
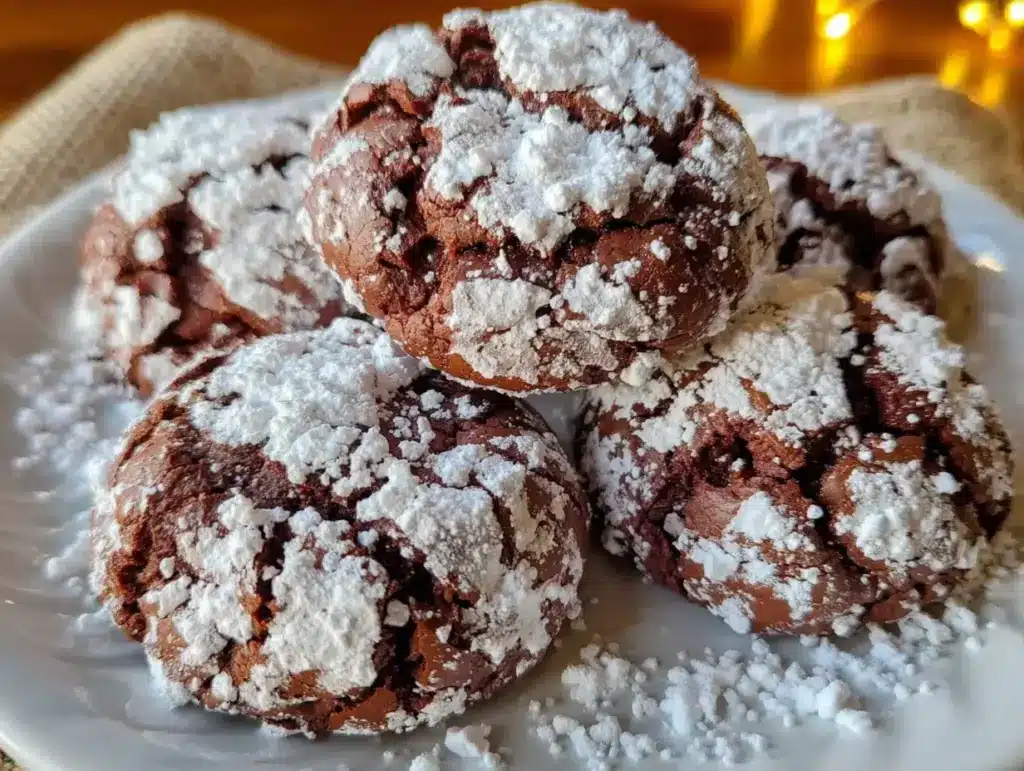
What started as a desperate Tuesday night rescue mission turned into the most requested dessert in our house. These chocolate crinkle cookies with powdered sugar coating are the kind of treat that feels fancy but costs pennies to make. They’re fudgy in the middle, crackly on the outside, and dusted with enough powdered sugar to look like they came from a high-end bakery. (Spoiler: They don’t.)
I’ve made these cookies at least fifteen times in the last six months. Sometimes I double the batch because my teenagers eat them so fast they vanish before dinner. Sometimes I make them for school bake sales where they sell out in minutes. But mostly, I make them because they’re easy, cheap, and reliable.
If you’re looking for a dessert that won’t break the bank but will definitely win hearts, you need to try this chocolate crinkle cookie recipe. It’s simple, it’s forgiving, and it tastes incredible. Let me show you how to make them.
Why You’ll Love This Chocolate Crinkle Cookie Recipe
There are a lot of cookie recipes out there. But this one? It’s different. It’s the one I reach for when I need something quick, when I need to stretch my grocery budget, or when I just need a little comfort in the form of warm chocolate.
Here’s why this recipe has earned a permanent spot in our weekly rotation:
It Uses Pantry Staples — Seriously, if you have cake mix, you’re halfway there. I don’t mean to sound dismissive of from-scratch baking, but sometimes you just need what’s already in the cabinet. This recipe uses ingredients I always have on hand: flour, sugar, cocoa, butter, eggs, and cake mix. No fancy, hard-to-find items.
It’s Stupid Simple — You don’t need a stand mixer. You don’t need to chill the dough for 24 hours (though you can if you want to). You mix, roll, dip, and bake. It takes about 15 minutes of active time. I’ve made these while helping my kids with homework. It’s that easy.
It’s Incredibly Affordable — A box of cake mix costs about $1.50. Butter and eggs are usually already there. You can buy powdered sugar in bulk. This recipe makes a big batch of cookies for under $5. Compare that to a dozen store-bought cookies for $6-8, and you’re saving money AND getting better flavor.
It’s Kid-Approved — My picky eater, who usually turns his nose up at “brown” food, loves these. The texture is perfect—not too cakey, not too crispy. Just right. And the powdered sugar dusting makes them feel like a special occasion treat, even if it’s just a random Wednesday.
They Freeze Well — This is a huge win for busy parents. I often roll the dough into balls and freeze them on a baking sheet. Then I transfer them to a bag. When I need a last-minute treat, I just bake them from frozen. It saves so much stress.
So basically, this recipe checks all the boxes: cheap, easy, delicious, and kid-friendly. It’s the kind of chocolate crinkle cookie you’ll make on repeat.
Ingredients You’ll Need for Chocolate Crinkle Cookies
Here’s the best part: you probably have most of this already. I’m not asking you to run to the store for exotic ingredients. This is budget-friendly cooking at its finest.
Yellow Cake Mix (15.25 oz box) — Yes, cake mix. It provides the structure and sweetness. I use yellow for a vanilla base that contrasts with the chocolate, but white cake mix works too. Don’t skip the dry mix—this is the secret to the crinkle texture.
Unsweetened Cocoa Powder (½ cup) — This is where the chocolate flavor comes from. Use regular unsweetened cocoa, not Dutch-processed if you can help it, though Dutch-processed works in a pinch. I buy the big canister at the grocery store—it’s cheaper per ounce.
Vegetable Oil (½ cup) — Oil keeps the cookies fudgy. Butter can make them cakey. I use vegetable oil because it’s neutral and cheap. Olive oil would change the flavor too much.
Eggs (2 large) — Room temperature is best, but cold works fine. They bind everything together. I usually have a carton in the fridge already.
Vanilla Extract (1 teaspoon) — Just a splash to round out the flavors. I use the generic store brand—it’s exactly the same as the name brand for baking.
Powdered Sugar (1 cup, for rolling) — This is what creates the crinkle effect. The dough sticks to the sugar, then cracks during baking. Buy a large bag of powdered sugar; you’ll use it for other recipes like lemon blueberry bundt cake or creamy macaroni and cheese toppings.
Optional: Chocolate Chips (½ cup) — I sometimes add semi-sweet chocolate chips to the dough for extra gooeyness. It’s not necessary, but if you have them, throw them in.
Pro Tip: Don’t use butter instead of oil. The cookies won’t be fudgy. And don’t use brown sugar instead of white—it changes the moisture content. Stick to the ingredients for the best results.
Equipment Needed
You don’t need fancy equipment for this. Here’s what I actually use:
Large Mixing Bowl — I use a 4-quart bowl. It needs to be big enough to mix the dough without making a mess. My plastic bowl from IKEA works fine.
Whisk or Wooden Spoon — You don’t need a mixer. A whisk works best to incorporate the cocoa powder. A wooden spoon works too, but you might need to stir a bit harder.
Baking Sheets — Two standard 13×18 inch sheets. I line them with parchment paper for easy cleanup. If you don’t have parchment, grease the sheets lightly.
Cooling Rack — Essential for letting the cookies cool evenly. I have a simple wire rack from the dollar store.
Cookie Scoop or Tablespoon — For uniform sizing. Uniformity means even baking. I use a small ice cream scoop for consistency.
Small Bowl — For holding the powdered sugar for rolling.
Optional: Food Processor — If you want to make your own cake mix (you don’t have to), but honestly, the box is faster and cheaper for most people.
How to Make Chocolate Crinkle Cookies: Step-by-Step

Alright, let’s make these! I’m walking you through exactly how I do it, including the little tricks I’ve picked up over the years.
Step 1: Prep Your Oven and Pans
Preheat your oven to 350°F (175°C). Line two baking sheets with parchment paper. This prevents sticking and makes cleanup a breeze. I always prep this first because once the dough is mixed, you want to get the cookies in the oven quickly.
Step 2: Mix the Dry Ingredients
In a large bowl, combine the dry cake mix and unsweetened cocoa powder. Whisk them together until there are no lumps. The cocoa powder can be clumpy, so take a minute to break it up. This ensures an even chocolate flavor in every cookie.
Step 3: Add Wet Ingredients
Add the vegetable oil, eggs, and vanilla extract to the dry mixture. Stir with a wooden spoon or whisk until the dough comes together. It will look thick and slightly sticky. Don’t overmix—it’s okay if it’s a bit lumpy. If you’re adding chocolate chips, fold them in now.
Step 4: Chill the Dough (Optional but Recommended)
Cover the bowl with plastic wrap and refrigerate for at least 30 minutes. This step is crucial. Chilled dough is easier to handle and creates better cracks. If you’re in a rush, you can skip this, but the cookies might spread more. I usually chill it while I’m cleaning up the kitchen.
Step 5: Roll into Balls
Take a tablespoon of dough and roll it into a ball between your palms. Aim for about 1.5 inches in diameter. They don’t need to be perfect—irregular shapes look rustic and homemade. Place them on a plate or tray while you roll the rest.
Step 6: Coat in Powdered Sugar
Fill a small bowl with powdered sugar. Roll each dough ball in the sugar until it’s completely coated. Shake off any excess. This layer of sugar is what creates the crinkle effect. The more sugar you use, the more pronounced the cracks will be. I sometimes roll them twice for extra coverage.
Step 7: Bake
Place the sugar-coated balls on the prepared baking sheets, leaving about 2 inches between them. They will spread and crack. Bake for 10-12 minutes. The cookies should look set on the outside but still soft in the center. They will continue to cook on the hot pan.
Step 8: Cool and Serve
Let the cookies cool on the baking sheet for 5 minutes. Then transfer them to a wire rack to cool completely. They crisp up as they cool. Dust with a little extra powdered sugar if you want them to look extra fancy. Serve with a cold glass of milk.
Total Time: About 45 minutes (15 minutes active, 30 minutes chilling/baking)
Expert Tips & Tricks for Perfect Crinkles
Here’s everything I’ve learned from making these dozens of times. These tips will save you from my mistakes.
Don’t Overbake
The biggest mistake people make is baking these until they look done. They should look slightly underdone when you take them out. They firm up as they cool. If you bake them until they look hard, they’ll be dry. Aim for soft centers.
Chill the Dough
I cannot stress this enough. Chilled dough holds its shape better and creates those dramatic cracks. If the dough is too warm, it will spread into flat disks instead of crinkly mounds. Thirty minutes in the fridge is enough.
Use Enough Powdered Sugar
Don’t be shy with the sugar. The dough needs to be fully coated. If you rush this step, the cookies won’t crinkle properly. I usually roll each ball in the sugar, turn it over, and roll again. It should look like a snowball.
Space Them Out
These cookies spread. Give them at least 2 inches of space on the baking sheet. If they’re too close, they’ll merge into one giant chocolate pancake. I use a cookie scoop to ensure uniform size, which means even baking.
Double the Batch
This recipe doubles easily. I often make two batches because my kids eat them so fast. Just make sure you have enough baking sheets or bake in batches. The dough stores well in the fridge for up to 3 days, so you can roll and bake over a few days.
Freeze the Dough
For meal prep, roll the dough into balls, coat them in sugar, and freeze them on a baking sheet. Once frozen, transfer to a freezer bag. Bake from frozen, adding 1-2 minutes to the bake time. This is a lifesaver for busy weeknights.
Variations & Substitutions
Once you’ve nailed the basic version, here’s how you can mix it up. I’ve tried all of these.
Red Velvet Crinkles
Use red velvet cake mix instead of yellow. The color is gorgeous, and the cream cheese flavor in the mix pairs well with the chocolate. My kids love the festive look.
Chocolate Chip Crinkles
Add ½ cup of semi-sweet chocolate chips to the dough. It adds extra gooeyness and makes them even more decadent. I do this for special occasions.
Mint Chocolate Crinkles
Add ½ teaspoon of peppermint extract to the dough. It gives a refreshing twist. Great for holidays.
Gluten-Free Version
Use a gluten-free yellow cake mix. The texture might be slightly different, but it still works. I’ve used Bob’s Red Mill cake mix with good results.
Vegan Version
Replace eggs with flax eggs (1 tablespoon ground flaxseed + 3 tablespoons water per egg) and use vegan butter or oil. The texture might be less fudgy, but it’s still tasty. My lactose-intolerant friend likes this version.
Different Flavors
You can use white cake mix for a milder chocolate flavor, or chocolate cake mix for an even more intense chocolate taste. I prefer yellow for the contrast.
Serving & Storage
How to Serve:
I usually serve these warm with a cold glass of milk. But they’re also great at room temperature. I pack them in lunchboxes for school treats—they hold up well.
Side Dishes:
These are perfect on their own, but they also pair well with coffee or vanilla sweet cream cold brew. If you’re having a party, serve them with creamy banana pudding for a dessert spread.
Storage Instructions:
Store in an airtight container at room temperature for up to 5 days. They stay soft and fudgy. If they start to harden, add a slice of bread to the container—the bread releases moisture and softens the cookies.
Reheating:
Microwave for 10-15 seconds to warm them up. They’ll be soft and gooey again. Don’t overheat, or they’ll get tough.
Freezing:
As mentioned, you can freeze the dough balls. You can also freeze baked cookies, but they might lose some texture. I prefer freezing the dough for best results.
Nutrition Information
I’m not a nutritionist, but here’s the breakdown if you’re tracking. Keep in mind that these are rich, indulgent cookies.
Per Cookie (based on 24 cookies):
- Calories: 180
- Protein: 3g
- Carbs: 28g
- Fiber: 1g
- Sugar: 22g
- Fat: 7g
What to Know:
These are higher in sugar and carbs because of the cake mix and powdered sugar. But they’re a treat, not a health food. Enjoy them in moderation. If you’re watching sugar, you can reduce the powdered sugar coating or use a sugar substitute, though the texture might change.
Dietary Notes:
Contains: gluten, dairy, eggs. Can be made: gluten-free, vegetarian. Not suitable for: vegan (without modifications), dairy-free (without modifications).
Final Thoughts
So that’s my go-to chocolate crinkle cookie recipe! It’s simple, it’s cheap, and it tastes amazing. I’ve probably talked your ear off at this point, but when you make a recipe this often, you have a lot to say about it.
This has saved me on countless occasions. It’s my answer to “what’s for dessert” when I’m tired, don’t want to spend a lot of money, and still want something that tastes really good. My kids are happy, my husband’s happy, and I’m happy because I’m not stressed about cooking.
Make it yours! Try different cake mixes, add chocolate chips, or freeze the dough for later. The best recipes are the ones you adapt to your family’s tastes.
If you make this, drop a comment and let me know what you think! I love hearing how recipes turn out in your kitchen. And if something doesn’t work, tell me that too—I’m here to help troubleshoot.
Happy baking! And I hope your kitchen smells half as good as mine does right now.
Frequently Asked Questions
Can I use butter instead of oil?
You can, but the cookies will be cakier rather than fudgy. Oil keeps the moisture in, which is key for the crinkle texture. If you must use butter, melt it and let it cool slightly before adding. But I recommend sticking with oil for the best results.
Why didn’t my cookies crinkle?
Usually, this means the dough wasn’t chilled enough, or you didn’t use enough powdered sugar. Chilled dough holds its shape and cracks better. Also, make sure the dough balls are fully coated in sugar. If the sugar slides off, the cracks won’t form.
Can I make this dough ahead of time?
Yes! The dough can be refrigerated for up to 3 days or frozen for up to 3 months. If you freeze it, thaw it in the fridge overnight before rolling and baking.
How do I store leftover cookies?
Store them in an airtight container at room temperature for up to 5 days. If they start to get soft, add a slice of bread to the container to restore crispness. Don’t refrigerate them—they’ll get stale faster.
Can I use a different cake mix flavor?
Absolutely! White cake mix works well for a milder flavor. Red velvet cake mix adds a festive color and cream cheese flavor. Chocolate cake mix makes them even more chocolatey. Just keep the amounts the same.
Do I need to sift the cocoa powder?
It’s helpful but not necessary. Cocoa powder can be clumpy, so whisking it into the dry ingredients helps break up the lumps. If you have a sifter, use it. If not, just whisk vigorously.
Can I double this recipe?
Yes, double everything. You’ll just need more baking sheets or bake in batches. The dough stores well in the fridge, so you can roll and bake over a few days. This is great for meal prep or large gatherings.
Pin This Recipe!


Chocolate Crinkle Cookies: Easy Budget-Friendly Treat
- Total Time: 45 minutes
- Yield: 24 cookies 1x
Description
These fudgy, crackly chocolate crinkle cookies are made with pantry staples like cake mix and cocoa powder. They are easy to make, affordable, and perfect for busy weeknights or bake sales.
Ingredients
- 15.25 oz box yellow cake mix
- 1/2 cup unsweetened cocoa powder
- 1/2 cup vegetable oil
- 2 large eggs
- 1 teaspoon vanilla extract
- 1 cup powdered sugar (for rolling)
- 1/2 cup semi-sweet chocolate chips (optional)
Instructions
- Preheat oven to 350°F (175°C) and line two baking sheets with parchment paper.
- In a large bowl, whisk together the dry cake mix and unsweetened cocoa powder until no lumps remain.
- Add the vegetable oil, eggs, and vanilla extract to the dry mixture. Stir with a wooden spoon or whisk until the dough comes together. If using, fold in chocolate chips.
- Cover the bowl with plastic wrap and refrigerate the dough for at least 30 minutes.
- Roll the dough into 1.5-inch balls using a tablespoon or cookie scoop.
- Fill a small bowl with powdered sugar and roll each dough ball until completely coated, shaking off excess.
- Place the coated dough balls on the prepared baking sheets, leaving 2 inches of space between them.
- Bake for 10-12 minutes until the edges look set but the centers are still soft.
- Let the cookies cool on the baking sheet for 5 minutes, then transfer to a wire rack to cool completely.
Notes
Do not overbake; the cookies should look slightly underdone when removed from the oven as they firm up while cooling. Chilling the dough is crucial for creating the crinkle effect. You can freeze the dough balls for up to 3 months and bake from frozen, adding 1-2 minutes to the bake time. Store leftovers in an airtight container at room temperature for up to 5 days.
- Prep Time: 15 minutes
- Cook Time: 10-12 minutes
- Category: Dessert
- Cuisine: American
Nutrition
- Serving Size: 1 cookie
- Calories: 180
- Sugar: 22
- Sodium: 150
- Fat: 7
- Saturated Fat: 2
- Carbohydrates: 28
- Fiber: 1
- Protein: 3
Keywords: chocolate crinkle cookies, cake mix cookies, budget friendly dessert, easy cookies, fudgy cookies, kid friendly treats