One rainy afternoon last fall, I found myself staring at the clock, realizing my kids would be home from school in less than 15 minutes—and the pantry was nearly bare. No time for oven preheating, no energy for complicated baking. I needed a quick, no-fuss snack that would satisfy their after-school hunger without turning the kitchen into a disaster zone.
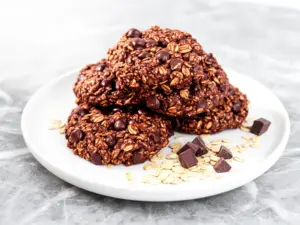
That’s when I whipped up these after-school no-bake chocolate oat cookies—a recipe I’d stumbled upon years ago but had perfected through trial, error, and a few “oops” moments (like the batch that got stuck to the wax paper). This recipe is now my secret weapon on busy afternoons. It’s fast, requires just a handful of pantry staples, and the best part? My kids absolutely crave them. Honestly, so do I.
These cookies aren’t fancy, but they’re pure comfort. Rich chocolate meets hearty oats in chewy, gooey little bites that feel like a hug after a long day. I’ve made these dozens of times, sometimes doubling the batch because they disappear faster than I can say “snack time.” If you’ve been searching for a quick, fuss-free way to keep your family happy and fueled, this no-bake chocolate oat cookies recipe might just be what you didn’t know you needed.
Why You’ll Love This Recipe
I could go on about how much my family loves these cookies, but here are the real reasons this recipe has earned a permanent spot in my snack rotation:
- Quick and effortless — From start to finish, these cookies take less than 20 minutes, and most of that is just waiting for them to set. Perfect for the crazy after-school rush.
- No baking required — No oven? No problem. This recipe is a lifesaver on hot summer days or when you just want to avoid heating up the kitchen.
- Pantry staples — You probably have everything you need right now: oats, cocoa powder, peanut butter, sugar. No last-minute grocery runs required.
- Kid-friendly — My kids love helping with these, especially scooping and shaping the cookies. It’s a fun way to get them involved without a mess of flour everywhere.
- Flexible and forgiving — Don’t love peanut butter? Swap it out. Want to add a little crunch? Toss in some chopped nuts. This recipe adapts to your family’s tastes.
- Comfort food with a little nutrition — Oats bring fiber and a bit of wholesomeness, while the chocolate satisfies those sweet cravings. A snack that feels indulgent but isn’t just sugar.
Honestly, these cookies have saved me more times than I can count—whether it’s a last-minute snack emergency or a quick dessert for unexpected guests. Once you try them, I bet they’ll become your go-to too.
Ingredients You’ll Need
Here’s the fun part: you probably already have nearly all of these ingredients in your pantry or fridge. I’m pretty particular about a few key items because they make a big difference in taste and texture.
- Old-fashioned rolled oats (2 ½ cups / 225g) — Not instant oats. The old-fashioned kind gives the cookies a hearty chew and structure. Quick oats get too mushy.
- Unsweetened cocoa powder (½ cup / 50g) — I use natural cocoa powder for that rich, chocolatey flavor. Dutch-processed works too but may change the color slightly.
- Granulated sugar (2 cups / 400g) — Regular white sugar works fine. Brown sugar changes the texture and makes them softer, which is fine if you like that.
- Unsalted butter (½ cup / 115g) — Adds richness and helps bind everything. Salted butter is okay if you adjust the salt elsewhere.
- Milk (⅔ cup / 160ml) — Whole milk gives the best creaminess, but 2% works too. Non-dairy milk can be substituted but may slightly affect texture.
- Peanut butter (1 cup / 250g) — Creamy or chunky, your choice. This is the heart of the cookies, so use a good-quality peanut butter you love. I avoid natural peanut butter here because it can separate.
- Vanilla extract (1 teaspoon) — Just a little boost of flavor. Fresh vanilla is always a plus.
- Salt (⅛ teaspoon) — Balances the sweetness and enhances the chocolate flavor.
Optional add-ins: If you want to get creative, try tossing in chopped walnuts, shredded coconut, or mini chocolate chips. I sometimes add a pinch of cinnamon for warmth or a little espresso powder to deepen the chocolate flavor.
Equipment Needed
You don’t need anything fancy here. I keep it simple, which is exactly why this recipe is such a lifesaver.
- Medium saucepan — For melting the butter, sugar, cocoa, and milk together. A non-stick pan helps but isn’t mandatory.
- Mixing bowl — To combine the oats and peanut butter after heating the chocolate mixture.
- Wooden spoon or heatproof spatula — For stirring the hot mixture and then folding in the oats.
- Baking sheet or tray — To drop the cookies onto as they set. I like to line mine with parchment or wax paper for easy cleanup.
- Measuring cups and spoons — Accuracy helps, especially with the cocoa and sugar.
- Spoon or cookie scoop — To portion out the cookies evenly. I use a regular tablespoon and it works fine.
How to Make It: Step-by-Step

Alright, let’s get these after-school no-bake chocolate oat cookies going. I’ll walk you through exactly how I do it, including some little tips that make all the difference.
Step 1: Prep Your Workspace (5 minutes)
Line a baking sheet with parchment paper or wax paper. Measure out your oats and set them in a large mixing bowl. Have your peanut butter and vanilla ready. This makes everything smooth when you’re working with hot ingredients.
Step 2: Make the Chocolate Mixture (5 minutes)
In a medium saucepan over medium heat, combine the butter, sugar, cocoa powder, milk, and salt. Stir constantly until the butter melts and the sugar dissolves. The mixture should be smooth and glossy—don’t let it boil too hard, just a gentle simmer. This step is where the magic happens, so pay attention to the texture and smell. It’ll smell like chocolate heaven.
Step 3: Combine with Peanut Butter and Vanilla (1-2 minutes)
Remove the pan from heat. Stir in the peanut butter and vanilla extract until completely smooth and combined. The peanut butter will melt into the warm chocolate mixture, making it rich and creamy.
Step 4: Add the Oats (1 minute)
Pour the chocolate mixture over the oats in your bowl. Use your wooden spoon or spatula to fold everything together until the oats are fully coated. The mixture will be thick and sticky—perfect.
Step 5: Form the Cookies (5 minutes)
Using a spoon or cookie scoop, drop spoonfuls of the mixture onto your prepared baking sheet. I like my cookies about 2 inches wide, but you can make them smaller or bigger. Flatten them slightly if you want a thinner cookie. Work quickly because the mixture sets as it cools.
Step 6: Let Them Set (at least 30 minutes)
Leave the cookies at room temperature or pop them in the fridge to speed up the process. They’ll firm up into chewy, chocolatey treats that hold their shape but still have a nice bite.
Step 7: Serve and Enjoy!
Once set, these cookies are ready to enjoy. Store leftovers in an airtight container. They keep well at room temperature for a few days or in the fridge for up to a week.
Expert Tips & Tricks
- Don’t rush the melting step — Stir constantly and keep the heat moderate to avoid burning the sugar or cocoa. Burnt chocolate is bitter and ruins the batch.
- Choose the right oats — Old-fashioned rolled oats give the best texture. Instant oats make the cookies mushy and less satisfying.
- Use quality peanut butter — The flavor of the peanut butter shines here, so pick one you love. Creamy is easier to mix, but chunky adds nice texture if you prefer.
- Work quickly when forming cookies — The mixture thickens as it cools, so have your tray ready to go.
- Customize with add-ins — Chopped nuts, dried fruit, or even a sprinkle of sea salt on top before setting can take these cookies up a notch.
- Storage — Keep cookies in an airtight container to maintain chewiness. Refrigeration thickens them up but can make them a bit harder, so bring to room temp before eating.
Variations & Substitutions
Once you’ve nailed the classic version, here are some ways I’ve mixed things up depending on what I have on hand or what mood we’re in:
- Nut Butter Swap — Use almond butter, cashew butter, or sunflower seed butter instead of peanut butter. Just watch for differences in oil content, which can affect texture.
- Vegan Version — Substitute the butter with coconut oil and use a plant-based milk like almond or oat milk. Make sure your peanut butter is vegan-friendly (most are).
- More Chocolate — Toss in ½ cup mini chocolate chips after mixing in the oats for extra melty pockets of chocolate.
- Coconut Lover’s — Add ½ cup shredded unsweetened coconut along with the oats.
- Superfood Boost — Stir in a tablespoon of chia seeds or flaxseed meal for a little extra nutrition.
- Spiced Up — A pinch of cinnamon, nutmeg, or even cayenne pepper adds unexpected warmth and depth.
Serving & Storage
These cookies are perfect for after-school snacks, but I’ve also packed them in lunchboxes and even brought them to casual gatherings. They hold up well and don’t get too messy.
Serving ideas: Pair with a cold glass of milk or a cup of tea for a cozy treat. When friends come over, I sometimes set out a little cookie platter with a few variations for everyone to try.
Storage tips: Store cookies in an airtight container at room temperature for up to 4 days. For longer storage, keep them in the fridge for up to a week. If they get too firm, just let them sit at room temperature for 10 minutes before eating.
Pro tip: If you want to freeze these, wrap individual cookies in plastic wrap and place them in a freezer bag. Thaw at room temperature for 30 minutes before enjoying.
Nutrition Information
| Per Serving (1 cookie, approx. 12 cookies total) | Amount |
|---|---|
| Calories | 210 |
| Protein | 5g |
| Carbohydrates | 27g |
| Fiber | 3g |
| Sugar | 15g |
| Fat | 10g |
| Saturated Fat | 3g |
| Cholesterol | 15mg |
| Sodium | 90mg |
| Calcium | 40mg |
Look, these aren’t diet cookies—they’re a treat. But they do have some fiber from the oats and a decent amount of protein thanks to the peanut butter. I like that they satisfy sweet cravings without feeling like empty junk food.
Final Thoughts
So there you have it—my tried-and-true after-school no-bake chocolate oat cookies. I know I’ve probably shared more than you expected, but that’s what happens when you rely on a snack this much. It’s been a game-changer in our busy household and a sweet little moment of joy for my kids after a long day.
Make these your own. Tweak the add-ins, swap the nut butter, or double the batch for a crowd. The best recipes are the ones you can customize to your family’s tastes and schedule.
If you give these cookies a try, drop a comment below and let me know how they turned out! And hey, if something didn’t work or you have questions, I’m here to help. Happy snacking—and may your afternoons be a little sweeter (and easier) from now on.
Frequently Asked Questions
Q: Can I use natural peanut butter for this recipe?
A: I’ve tried natural peanut butter before, and it tends to separate and make the cookies oily or crumbly. If that’s all you have, stir it well before measuring and consider chilling the mixture a bit longer before forming cookies. For best results, creamy, processed peanut butter works better.
Q: My cookies didn’t set—what went wrong?
A: Usually, if the cookies won’t firm up, it means the chocolate mixture wasn’t cooked enough or the ratios were off. Make sure your sugar is fully dissolved in the butter and milk mixture, and that you’ve heated it to a gentle simmer. Also, check your measurements—too much liquid or not enough oats can cause this.
Q: How long do these cookies last?
A: At room temperature, they stay fresh for about 4 days in an airtight container. Refrigerated, they last up to a week but might get firmer. You can freeze them for up to 3 months if wrapped well.
Q: Can I substitute the sugar with honey or maple syrup?
A: Since this recipe relies on crystallized sugar to set properly, liquid sweeteners like honey or maple syrup won’t work the same and can make the cookies too soft or sticky. If you want to try a natural sweetener, look for recipes specifically designed for those.
Q: Can I add other mix-ins like nuts or dried fruit?
A: Absolutely! Nuts, dried cranberries, shredded coconut, or even mini chocolate chips all work well. Just fold them in with the oats before shaping the cookies.
Q: What if I don’t have cocoa powder—can I use melted chocolate instead?
A: Cocoa powder is ideal here because it blends smoothly with the sugar and butter mixture. Melting chocolate changes the texture and setting time. If you want to experiment, try recipes that specifically call for melted chocolate.
Q: Can I make these cookies gluten-free?
A: Yes! Just make sure you use certified gluten-free oats. Most rolled oats are naturally gluten-free, but cross-contamination can happen during processing.
By the way, if you’re into easy, kid-friendly snacks, you might enjoy my no-bake peanut butter bars or these homemade granola bars—both perfect for quick energy and minimal fuss.
Pin This Recipe!


After-School No-Bake Chocolate Oat Cookies
- Total Time: 40 minutes
- Yield: 12 cookies 1x
Description
Quick and easy no-bake chocolate oat cookies that are perfect for after-school snacks. These chewy, chocolatey treats require no oven and use simple pantry staples.
Ingredients
- 2 ½ cups old-fashioned rolled oats (225g)
- ½ cup unsweetened cocoa powder (50g)
- 2 cups granulated sugar (400g)
- ½ cup unsalted butter (115g)
- ⅔ cup milk (160ml), whole or 2%
- 1 cup peanut butter (250g), creamy or chunky
- 1 teaspoon vanilla extract
- ⅛ teaspoon salt
Instructions
- Line a baking sheet with parchment paper or wax paper. Measure out oats into a large mixing bowl and have peanut butter and vanilla ready.
- In a medium saucepan over medium heat, combine butter, sugar, cocoa powder, milk, and salt. Stir constantly until butter melts and sugar dissolves, mixture is smooth and glossy. Avoid boiling.
- Remove pan from heat. Stir in peanut butter and vanilla extract until smooth and combined.
- Pour chocolate mixture over oats. Fold together with a wooden spoon or spatula until oats are fully coated.
- Drop spoonfuls of mixture onto prepared baking sheet using a spoon or cookie scoop. Flatten slightly if desired. Work quickly as mixture sets as it cools.
- Let cookies set at room temperature or refrigerate for at least 30 minutes until firm.
- Serve and enjoy. Store leftovers in an airtight container at room temperature for up to 4 days or in the fridge for up to a week.
Notes
Do not rush the melting step to avoid burning the sugar or cocoa. Use old-fashioned rolled oats for best texture. Work quickly when forming cookies as mixture thickens as it cools. Customize with add-ins like nuts, shredded coconut, or mini chocolate chips. Store in airtight container to maintain chewiness. Refrigeration thickens cookies; bring to room temperature before eating. For vegan version, substitute butter with coconut oil and use plant-based milk.
- Prep Time: 10 minutes
- Cook Time: 10 minutes
- Category: Snack
- Cuisine: American
Nutrition
- Serving Size: 1 cookie
- Calories: 210
- Sugar: 15
- Sodium: 90
- Fat: 10
- Saturated Fat: 3
- Carbohydrates: 27
- Fiber: 3
- Protein: 5
Keywords: no-bake cookies, chocolate oat cookies, after-school snack, easy cookies, peanut butter cookies, quick snack