I still remember the first time I tried to stuff an Oreo into a cookie. I was standing in my kitchen at 11 PM, feeling a bit guilty about the late-night craving, and I thought, “Why buy expensive bakery cookies when I can just throw one in my own dough?” I pressed the whole cookie into a ball of dough, popped it in the oven, and waited. When they came out, they looked fine. But the first time I bit into one? The Oreo slid right out, cold and hard, landing on my plate. The cookie itself was just… okay. It was a disaster. Not because the cookie was bad, but because I had skipped the most important step.
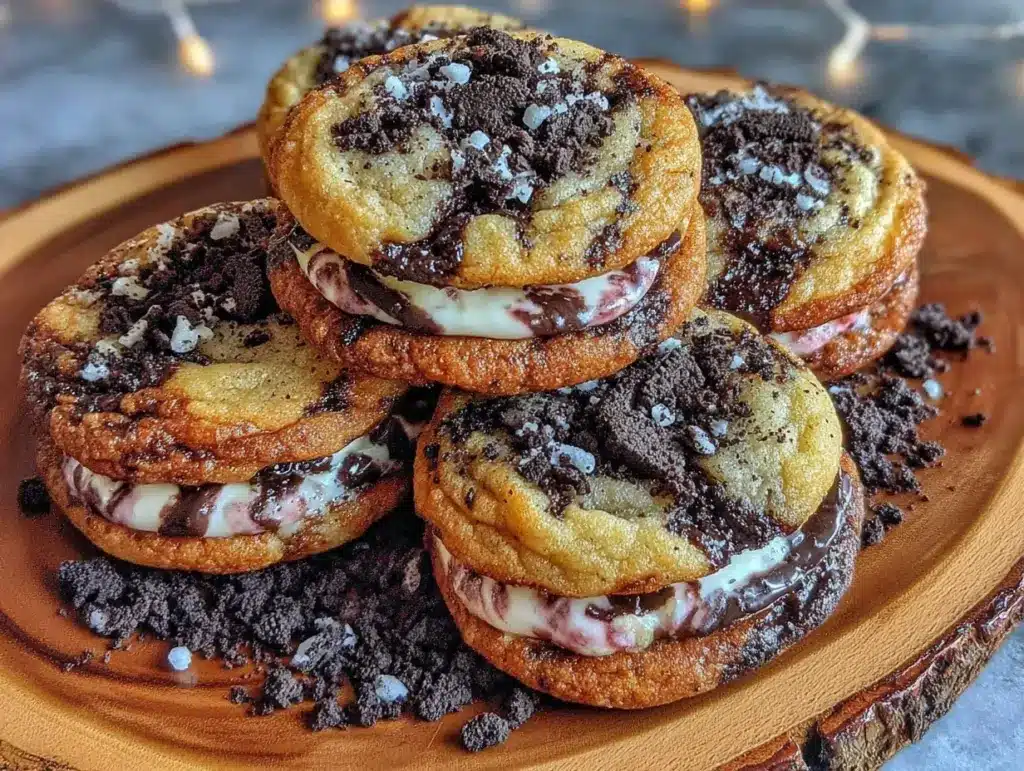
That was three years ago. Today, I make these Soft Oreo Stuffed Cookies at least once a month. They are the reason my pantry always has a box of Oreos (the sandwich kind, not the thin ones) and why my kids beg for dessert before dinner. These aren’t just chocolate chip cookies with a surprise. They are thick, chewy, gooey, and practically explode with creamy filling when you bite into them. And the best part? They cost pennies compared to anything from a bakery.
I’ve tested this recipe with different brands of cookies, different baking times, and even different types of chocolate chips. I’ve burned a few batches (oops) and I’ve underbaked enough to get doughy centers that are to die for. Through all the trial and error, I’ve landed on the perfect method. If you’re looking for a dessert that feels indulgent but is actually budget-friendly and incredibly easy to make, this is the one. Trust me, once you try these, you won’t go back to plain cookies. They’re the kind of treat that makes your house smell like heaven and your bank account stay intact.
Why You’ll Love This Recipe
There are a hundred cookie recipes out there, but this Soft Oreo Stuffed Cookies recipe has earned its permanent spot in my rotation for a few solid reasons. It’s not just about the taste (though that’s huge). It’s about how easy it is to pull together, how much joy it brings to my family, and how surprisingly simple it is to get that perfect stuffed center.
- Stupid Simple Technique — Seriously, if you can mix batter and press a cookie in the middle, you can master this. I’ve walked my teenage daughter through it over FaceTime while she was at college. She sent me a photo of her first batch with the caption “I did it!” No fancy equipment, no tempering chocolate, no stress.
- Costs Less Than Takeout — We’re talking about ingredients you likely already have or can buy for under $10. A dozen bakery cookies like this run you $15-$20. Making them at home? Maybe $3 for the cookies alone. That’s a win in my book.
- Kid-Approved (Even the Picky Ones) — My picky eater who usually refuses “fancy” food devours these. The cream filling is a universal language. I’ve served these to my son’s friends, and they always ask for the recipe. It’s the ultimate crowd-pleaser for playdates and school bake sales.
- Freezes Like a Dream — This is my secret weapon. I make a double batch, freeze the dough balls on a tray, and then bag them up. When I need a quick dessert or a last-minute treat for guests, I just pull them out. They bake up fresh in minutes. It’s meal prep for dessert, and it saves me so much time on busy weeknights.
- Customizable — Want to add chocolate chips? Done. Want to use mint Oreos for Christmas? Easy. Want to dip the bottoms in melted white chocolate? Go for it. This recipe is a blank canvas for your sweet tooth.
This recipe has saved me more times than I can count. It’s my go-to when I need to bribe the kids to clean their rooms, when I want to bring something impressive to a potluck, or just when I need a hug in cookie form. It’s reliable, delicious, and makes everyone happy.
Ingredients You’ll Need
Here’s the best part: you probably have most of this already in your pantry. This isn’t a recipe that requires a trip to three different specialty stores. It’s built on staples that most home cooks keep on hand. I’m particular about a few things here, especially the butter and the cookies, so I’ll tell you exactly why.
For the Cookie Dough
Unsalted butter (1 cup / 226g, softened) — This needs to be softened, not melted. If you microwave it too much, your cookies will spread too thin. I take it out of the fridge about an hour before I start. If I forget, I cut it into cubes and let it sit for 15 minutes. Soft butter creates that chewy texture we want.
Granulated sugar (1 cup / 200g) — This helps create the crisp edges. I don’t skimp here. The sugar caramelizes slightly in the oven, giving those cookies their signature crunch on the outside.
Brown sugar (1 cup / 220g, packed) — This is the secret to the chewy center. Moist brown sugar keeps the cookies soft for days. If you run out, you can make your own by mixing white sugar with a tablespoon of molasses, but store-bought works fine.
Large eggs (2) — Room temperature eggs mix better into the butter. Cold eggs can cause the butter to seize up a bit. I usually let them sit on the counter while I measure the flour.
Vanilla extract (2 teaspoons) — Real vanilla makes a huge difference. I use pure vanilla extract, not imitation. It adds that warm, nostalgic flavor that makes cookies taste like cookies.
All-purpose flour (2 ¼ cups / 280g) — Don’t over-measure! Spoon the flour into your measuring cup and level it off. Scooping directly from the bag packs it down and leads to dry, cakey cookies. I love these pancakes for a similar reason—measuring flour correctly is key to texture.
Baking soda (1 teaspoon) — This helps the cookies rise and brown. Make sure it’s not expired! I check the date on my baking soda every few months.
Salt (½ teaspoon) — Even though these are sweet, salt balances the flavor. Don’t skip it. It makes the chocolate taste more chocolatey.
For the Stuffing and Topping
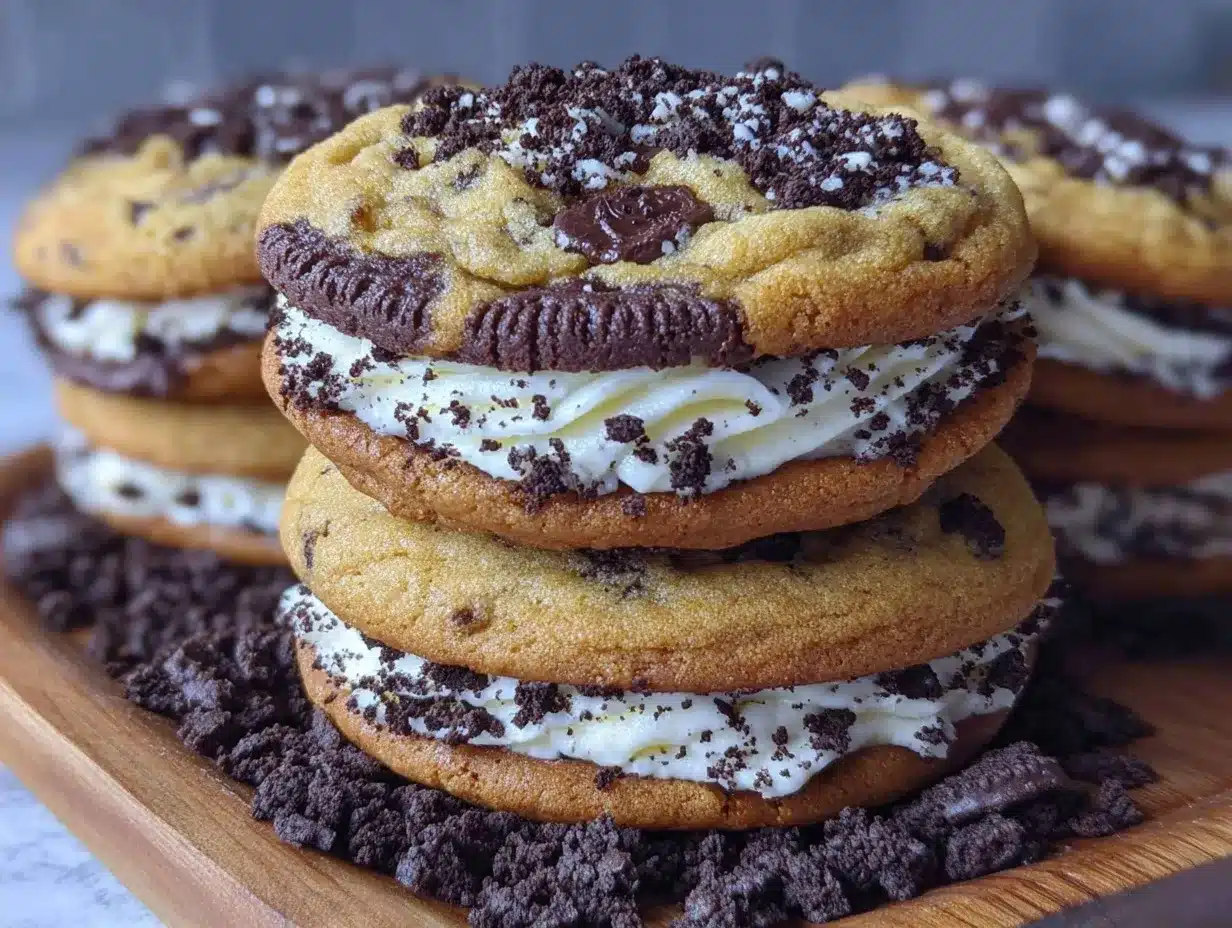
Oreo cookies (12 full cookies) — Standard size Oreos work best. If you use Double Stuf, you might want to use 24 cookies, but regular Oreos give a nice balance. Make sure they are fresh! Stale cookies won’t melt as nicely in the center.
Crushed Oreo crumbs (½ cup) — This is the secret weapon. Rolling the dough balls in crushed Oreos before baking gives them a beautiful, textured exterior that looks professional and tastes amazing. I just throw a few cookies in a ziplock bag and smash them with a rolling pin.
Chocolate chips (½ cup, optional) — I often add semi-sweet chocolate chips to the dough for extra gooeyness. It’s not traditional, but I love the contrast. If you’re keeping it classic, you can skip this.
Semi-sweet chocolate chips (1 cup, for mixing in) — I mix these into the dough *and* roll the dough balls in the crushed Oreos. It’s my personal twist that adds more chocolate flavor without overpowering the cream filling.
Equipment Needed
You don’t need fancy equipment for this. Here’s what I actually use.
Large mixing bowls — Two are helpful. One for wet ingredients, one for dry. I use my biggest stainless steel bowl for mixing everything together.
Electric mixer or wooden spoon — A hand mixer or stand mixer makes creaming the butter and sugar much easier and faster. But if you’re strong, a wooden spoon works fine. I usually use my mixer for 2 minutes, then switch to a spoon for the flour to avoid overmixing.
Baking sheets — Two standard sheet pans. I rotate them halfway through baking for even browning. If you only have one, that’s fine—you’ll just bake in batches.
Parchment paper or silicone baking mats — I’m obsessed with my silicone mats. They prevent sticking and make cleanup a breeze. Parchment paper works great too and is cheaper if you don’t want to invest in mats.
Cooling rack — Essential. Let the cookies cool on the pan for 5 minutes, then move them to a rack. If you leave them on the hot pan, they’ll keep cooking and get too crisp.
Ziplock bags and rolling pin — For crushing the Oreos. No food processor needed. Just throw them in a bag and smash away.
Cookie scoop — I use a 2-tablespoon scoop. It ensures all cookies are the same size, which means they bake evenly. If you don’t have a scoop, just use two spoons to drop mounds.
How to Make It: Step-by-Step
Alright, let’s make this! I’m walking you through exactly how I do it, including the little tricks I’ve picked up. This process takes about 30 minutes of active time, plus chilling.
Step 1: Prep Your Oven and Pan (2 minutes)
Preheat your oven to 350°F (175°C). Line your baking sheets with parchment paper or silicone mats. This prevents sticking and makes cleanup effortless. If you’re in a rush, you can skip the parchment, but the cookies might stick a bit more.
Step 2: Cream the Butter and Sugars (3 minutes)
In a large bowl, beat the softened butter, granulated sugar, and brown sugar together until light and fluffy. This takes about 2-3 minutes with a mixer. You want the mixture to look pale and creamy. This step incorporates air, which helps the cookies rise. Don’t rush this part—it’s the foundation of the texture.
Step 3: Add Wet Ingredients (1 minute)
Add the eggs one at a time, beating well after each addition. Then add the vanilla extract. Mix until just combined. The mixture might look slightly curdled at first, but that’s normal. It will come together in the next step.
Step 4: Mix Dry Ingredients (2 minutes)
In a separate bowl, whisk together the flour, baking soda, and salt. Then, gradually add the dry ingredients to the wet mixture. Mix on low speed or use a wooden spoon until *just* combined. Stop mixing as soon as you don’t see streaks of flour. Overmixing develops gluten, which makes cookies tough. We want tender, chewy cookies.
Step 5: Fold in Chocolate Chips (1 minute)
If you’re using chocolate chips, fold them in now with a spatula. I like to reserve a few chips to press onto the top of each cookie before baking for that bakery look.
Step 6: Crush the Oreos (2 minutes)
Place 4-5 Oreo cookies in a ziplock bag. Use a rolling pin or a heavy pan to crush them into coarse crumbs. You don’t want powder; you want little chunks. This gives the cookies a nice texture. Set aside.
Step 7: Stuff the Cookies (10 minutes)
This is the fun part. Scoop about 2 tablespoons of dough into your hand. Flatten it into a disc in your palm. Place one whole Oreo cookie in the center. Carefully fold the dough over the cookie, sealing the edges completely. Roll it into a smooth ball. Make sure there are no cracks or holes—the Oreo should be completely enclosed. If you see any white cream, pinch it shut. This prevents the Oreo from leaking out.
Once you have a smooth ball, roll it in the crushed Oreo crumbs. Coat it completely. Place it on the prepared baking sheet, leaving 2 inches between each cookie because they will spread.
Step 8: Bake (10-12 minutes)
Bake for 10-12 minutes. The cookies should look set on the edges but still soft in the center. They will continue to cook on the hot pan. Do not overbake! If they look done in the oven, they will be overdone on the counter. I like them slightly underdone for that gooey center.
Step 9: Cool and Serve
Let the cookies cool on the baking sheet for 5 minutes. This allows them to set. Then, transfer them to a wire rack to cool completely. Or, if you’re like me, eat one warm while it’s still soft. Warning: The center will be very hot!
Expert Tips & Tricks
Here’s everything I’ve learned from making this dozens of times. These tips will save you from my mistakes.
Chill the Dough (Optional but Recommended)
If you have time, chill the dough balls in the fridge for 30 minutes before baking. This helps them hold their shape better and prevents excessive spreading. If you’re in a hurry, you can skip this, but the cookies might be flatter. I usually chill them if I’m making them for a party where I want them to look perfect.
Seal the Edges Tight
The most common mistake is not sealing the dough around the Oreo properly. If there are cracks, the cream filling will leak out, and the cookie will look messy. Take your time with this step. Roll the dough ball between your palms to smooth out any seams.
Use Room Temperature Ingredients
Cold butter and eggs won’t mix properly. Make sure your butter is soft enough to leave an indent when you poke it. Cold ingredients lead to dense, heavy cookies.
Don’t Overbake
These cookies are meant to be soft. Take them out when the edges are just starting to turn golden brown. The centers should still look slightly underdone. They will firm up as they cool. If you bake them until they look fully done in the oven, they will be hard cookies, not soft stuffed cookies.
Double the Batch
This recipe freezes beautifully. I often make two batches. I bake half, and I freeze the rest of the dough balls on a baking sheet. Once they’re frozen solid, I transfer them to a ziplock bag. You can bake them straight from the freezer—just add 1-2 minutes to the baking time. This is perfect for having dessert ready to go.
Crush Texture Matters
For the crushed Oreo topping, aim for chunky crumbs, not fine dust. The chunks add a nice crunch and visual appeal. If you crush them too finely, they’ll just fall off during baking.
Variations & Substitutions
Once you’ve nailed the basic version, here’s how you can mix it up. I’ve tried all of these.
Double Stuf Oreos
If you love extra cream, use Double Stuf Oreos. You might want to use 24 cookies instead of 12, or just use one Double Stuf per cookie. The extra cream adds richness but also makes the stuffing process slightly harder since the cookie is thicker.
Mint Oreos
For holidays or just a change of pace, try Mint Oreos. They pair beautifully with white chocolate chips. I sometimes roll the mint cookie dough balls in crushed white chocolate cookie crumbs for a festive look.
White Chocolate Chip
Swap the semi-sweet chips for white chocolate chips. This makes the cookies sweeter and more vanilla-forward. It’s a great option for kids who aren’t big fans of dark chocolate.
Gluten-Free
Use a 1:1 gluten-free flour blend. Make sure it contains xanthan gum, or add ½ teaspoon to your dry ingredients. The texture will be slightly different but still delicious. I’ve used Bob’s Red Mill and it works well.
Dairy-Free
Use dairy-free butter and dairy-free Oreos (they make a vegan version). The result is surprisingly close to the original, though the cream filling might be slightly less creamy. It’s a great option for friends with allergies.
Snickerdoodle Style
Replace the crushed Oreos with a mixture of cinnamon and sugar. Roll the dough balls in cinnamon sugar instead. It’s a fun twist that keeps the Oreo center but changes the exterior flavor.
Serving & Storage
How to Serve:
I usually serve these warm, right out of the oven. They taste best on day one. But they’re also great at room temperature for lunchboxes or picnics. I often pair them with a cold glass of milk—or a homemade vanilla cold brew if I want something a bit more sophisticated for adult gatherings.
Refrigerator:
Store in an airtight container at room temperature for up to 5 days. The cookies stay soft for days if stored properly. If your kitchen is very humid, you might want to store them in the fridge, but they’ll harden slightly. Bring them to room temperature before eating.
Freezer:
Baked cookies: Freeze in an airtight container for up to 3 months. Thaw at room temperature.
Dough balls: Freeze on a tray, then bag up. Bake from frozen, adding 1-2 minutes to the bake time. This is my favorite way to have dessert ready.
Reheating:
If you have leftovers, microwave a cookie for 10-15 seconds. It warms up the center and makes it gooey again. It’s like getting a fresh cookie straight out of the oven.
Pro Tip:
If you’re making these for a crowd, double the batch. You won’t regret it. I always make two batches because they disappear so fast. One batch is never enough for my family!
Nutrition Information
I’m not a nutritionist, but here’s the breakdown if you’re tracking. Keep in mind that this is a dessert, so it’s higher in sugar and calories.
Per Cookie (based on 24 cookies):
- Calories: 280
- Fat: 14g
- Carbs: 38g
- Sugar: 24g
- Protein: 3g
These cookies are indulgent, but they’re also affordable. If you’re watching your sugar, enjoy one or two and pair with some fruit or yogurt. But honestly? These are meant to be enjoyed as a treat. They’re better than store-bought cookies, which often have more preservatives and less flavor.
Final Thoughts
So that’s my go-to Soft Oreo Stuffed Cookies! I’ve probably talked your ear off at this point, but when you make a recipe this often, you have a lot to say about it. These cookies have saved me more times than I can count. They’re my answer to “what’s for dessert?” when I’m tired, don’t want to go out, and still want something that tastes really good. My kids are happy, my husband’s happy, and I’m happy because I’m not stressed about cooking.
Make it yours! Try different Oreos, swap in your favorite chips, or adjust the amount of crumbs. The best recipes are the ones you adapt to your family’s tastes. And remember, if you mess up the sealing, it’s still delicious—just a bit messier. That’s the beauty of baking at home.
If you make this, drop a comment and let me know what you think! I love hearing how recipes turn out in your kitchen. And if something doesn’t work, tell me that too—I’m here to help troubleshoot. Happy cooking! And I hope your kitchen smells half as good as mine does right now.
Frequently Asked Questions
Can I use melted butter instead of softened butter?
You can, but the texture will be different. Melted butter makes cookies cakier and less chewy. For these stuffed cookies, you want that soft, creamed butter texture to hold the shape around the Oreo. If you accidentally melt your butter, chill the dough for longer (1-2 hours) to firm it up before scooping.
Why did my Oreo leak out during baking?
This usually happens if the dough wasn’t sealed tightly enough or if the dough was too warm. Make sure you press the dough firmly around the edges of the Oreo. Also, chilling the dough balls before baking helps the dough hold its shape better. If you see any cracks, pinch them shut with your fingers.
Can I make these ahead of time?
Absolutely! I recommend making the dough balls and freezing them. Bake them straight from the freezer when you need them. This is perfect for meal prep. You can have fresh cookies in 15 minutes without any prep work. Just add 1-2 minutes to the baking time.
What if I don’t have crushed Oreos for the topping?
You can skip the topping, but it adds a nice texture. If you don’t have Oreos to crush, you can use graham cracker crumbs or just leave them plain. The cookies will still be delicious. Alternatively, you can dip the bottoms in melted chocolate for a fancy finish.
How do I know when the cookies are done?
Look at the edges. When they start to turn golden brown and look set, they’re done. The centers should still look soft and slightly underdone. They will firm up as they cool on the pan. If they look fully done in the oven, they will be hard. Err on the side of underbaking for soft cookies.
Can I use Double Stuf Oreos?
Yes! Just note that they are thicker, so you might need a bit more dough to cover them. Or, you can use two regular Oreos per cookie. Double Stuf adds more cream, which is great if you love that flavor.
Do these cookies stay soft?
Yes, if stored properly in an airtight container. The brown sugar keeps them moist. If they start to harden, you can microwave them for 10 seconds to soften them up again. They’re best eaten within 3-4 days for maximum softness.
Pin This Recipe!


Soft Oreo Stuffed Cookies
- Total Time: 45 minutes
- Yield: 24 cookies 1x
Description
Thick, chewy, and gooey cookies stuffed with a whole Oreo cookie. This easy family recipe yields soft, indulgent treats that are budget-friendly and kid-approved.
Ingredients
- 1 cup (226g) unsalted butter, softened
- 1 cup (200g) granulated sugar
- 1 cup (220g) packed brown sugar
- 2 large eggs, room temperature
- 2 teaspoons pure vanilla extract
- 2 ¼ cups (280g) all-purpose flour
- 1 teaspoon baking soda
- ½ teaspoon salt
- 12 full standard Oreo cookies
- ½ cup crushed Oreo crumbs
- 1 cup semi-sweet chocolate chips (optional, for mixing in)
Instructions
- Preheat oven to 350°F (175°C) and line baking sheets with parchment paper or silicone mats.
- In a large bowl, beat softened butter, granulated sugar, and brown sugar until light and fluffy (2-3 minutes).
- Add eggs one at a time, beating well after each addition, then mix in vanilla extract.
- In a separate bowl, whisk together flour, baking soda, and salt.
- Gradually add dry ingredients to the wet mixture and mix until just combined. Do not overmix.
- Fold in semi-sweet chocolate chips if using.
- Place 4-5 Oreo cookies in a ziplock bag and crush into coarse crumbs using a rolling pin.
- Scoop about 2 tablespoons of dough, flatten into a disc, and place one whole Oreo in the center.
- Fold dough over the Oreo, sealing edges completely to prevent leaking, and roll into a smooth ball.
- Roll the dough ball in crushed Oreo crumbs to coat completely.
- Place cookies on prepared baking sheets, leaving 2 inches between each.
- Bake for 10-12 minutes until edges are set but centers are still soft.
- Let cookies cool on the baking sheet for 5 minutes, then transfer to a wire rack to cool completely.
Notes
Ensure butter is softened, not melted, for chewy texture. Seal dough tightly around Oreos to prevent leaking. Chill dough for 30 minutes if cookies spread too much. Dough balls can be frozen and baked from frozen, adding 1-2 minutes to bake time.
- Prep Time: 30 minutes
- Cook Time: 10-12 minutes
- Category: Dessert
- Cuisine: American
Nutrition
- Serving Size: 1 cookie
- Calories: 280
- Sugar: 24
- Sodium: 180
- Fat: 14
- Saturated Fat: 8
- Carbohydrates: 38
- Fiber: 1
- Protein: 3
Keywords: Oreo cookies, stuffed cookies, soft cookies, easy dessert, family recipe, chocolate chip cookies, kid-friendly