There is a specific kind of panic that hits right before a dinner party starts. You know the one. It’s 4 PM on a Friday, the appetizers are eaten, the main course is finished, and you’re staring into the abyss of dessert. Do you bake? Do you order takeout? Do you just serve cheese and hope nobody notices you’re sweating?
For years, that was my reality. I’d spend hours making a complicated cake, only to have it crack in the oven, or I’d order something expensive that tasted like cardboard. Then, I discovered vanilla bean panna cotta. It changed everything. It’s the only dessert I’ve ever made that looks like I spent three hours in a French patisserie, but actually takes about 15 minutes of active work.
I first made this vanilla bean panna cotta with berry compote for a book club gathering. I was terrified because half the women there had catered their own events. I set the plates out, and the room went quiet. Not the awkward quiet of “what is this?” but the good quiet of “please tell me how you made this.” It’s silky, it’s elegant, and it tastes like summer. I’ve made it for birthdays, anniversaries, and random Tuesday nights when I just want something special. It’s become my secret weapon for stress-free entertaining.
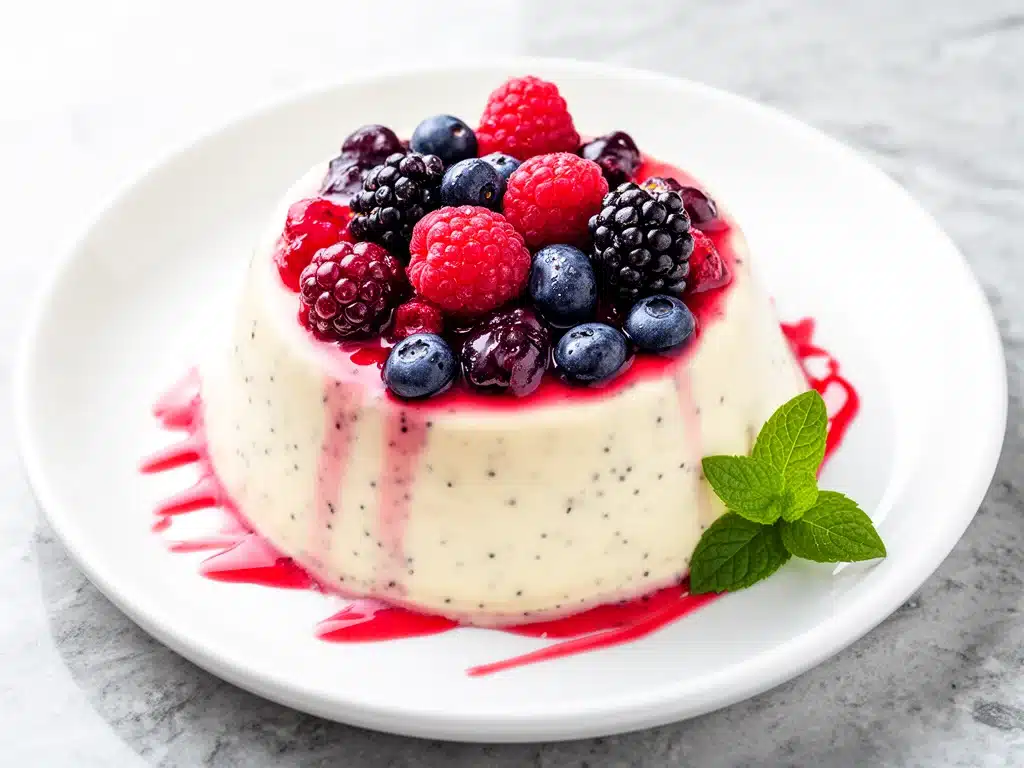
What I love most is the contrast. The creamy, cool panna cotta meets the bright, tangy berry compote. It’s sophisticated, but not stuffy. It’s sweet, but balanced. And the best part? You make it the day before. So when your guests arrive, your hands are clean, your hair is done, and you’re actually enjoying the party instead of hiding in the kitchen.
This recipe has been tested, tweaked, and perfected over dozens of parties. I’ve tried different milks, different gelatin amounts, and different berries. This combination? It’s the winner. It’s reliable, it’s delicious, and it’s going to make you look like a pro.
Why You’ll Love This Recipe
I’ve said it before, but I’ll say it again: this vanilla bean panna cotta is the ultimate low-effort, high-reward dessert. Here’s why it keeps me coming back to it, and why it should become your go-to for any occasion.
Zero Baking Required
No oven. No preheating. No waiting for cakes to cool. No worrying if the center is still gooey. This is all stovetop and fridge. If you can heat milk and stir, you can make this. I’ve made this while my kids were doing homework at the table. It’s that simple.
Make-Ahead Magic
This is the biggest selling point for me. You make this 24 to 48 hours ahead. The flavors meld, the texture sets perfectly, and you don’t have to think about it on the day you serve it. I’ve hosted dinner parties where the panna cotta was the only thing I didn’t stress about. Seriously. It just works.
Restaurant-Quality Elegance
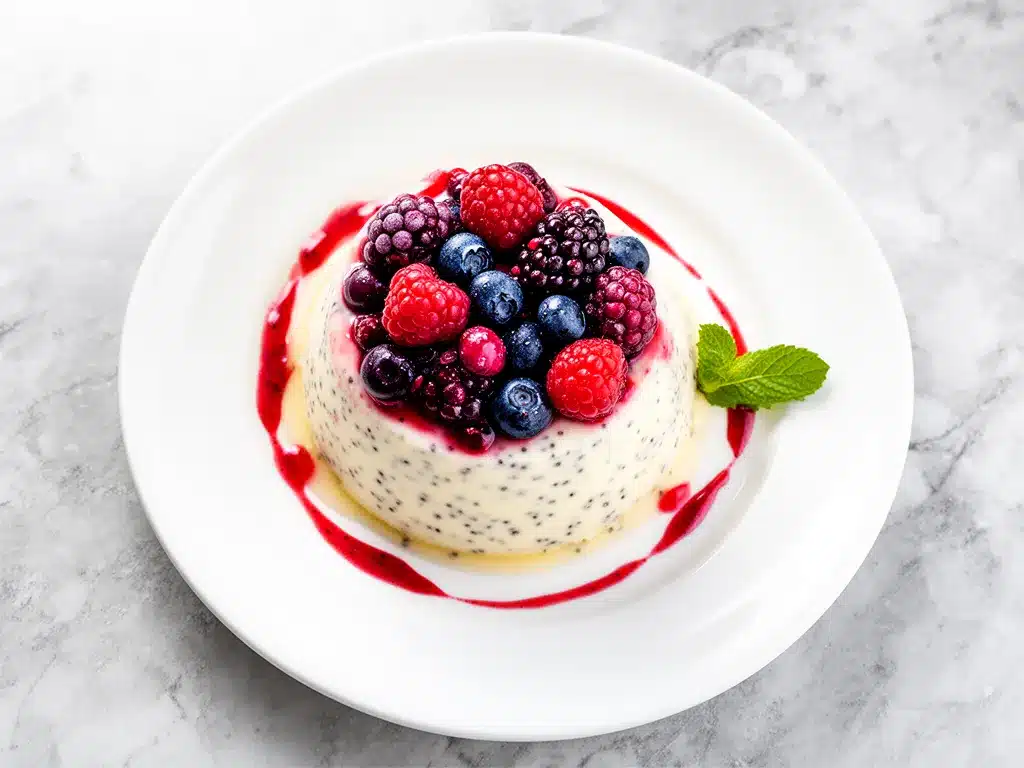
Don’t let the simplicity fool you. This looks incredible on a plate. The contrast of the white cream and the vibrant red berries is stunning. People assume you bought it from a high-end bakery. When you tell them you made it in your home kitchen in 15 minutes, their minds are blown. It’s a great way to impress without the stress.
Customizable to Perfection
Love berries? Use them. Hate berries? Try a raspberry coulis or a caramel sauce. Want it richer? Swap some milk for cream. Want it lighter? Use whole milk instead of heavy cream. This recipe is a canvas. I’ve made it with blueberries, blackberries, and even roasted peaches in the summer. It adapts to whatever you have.
Gluten-Free Friendly
Since it’s naturally gluten-free, I don’t have to worry about my gluten-sensitive friends. I can serve this to everyone without making two separate desserts. It’s inclusive and delicious. No one misses the gluten because the texture is so perfect.
Ingredients You’ll Need
Here’s the thing about panna cotta: it’s a very forgiving recipe. You don’t need fancy, hard-to-find ingredients. Most of this is stuff you probably have in your fridge or pantry. I’m particular about three things here, though, and I’ll tell you exactly why.
For the Panna Cotta Base
Heavy cream (2 cups / 480ml) — This is the body of the dessert. Don’t skimp. Use full-fat heavy cream. Half-and-half will make it too thin, and skim milk will make it watery. You want that rich, velvety mouthfeel. I buy the small cartons so it doesn’t go to waste.
Whole milk (1 cup / 240ml) — The milk lightens the cream so it’s not too heavy. Use whole milk for the best texture. If you’re watching calories, you can use 2% milk, but the texture will be slightly less lush.
Granulated sugar (½ cup / 100g) — This sweetens the base. You can adjust this to taste. If you prefer less sweet, reduce to ⅓ cup. But remember, the berry compote adds sweetness, so don’t make the panna cotta too bland.
Vanilla bean (1 whole pod) — This is where the magic happens. Scrape the seeds from the pod and add both the seeds and the pod to the cream. The seeds give you those beautiful speckles, and the pod infuses deep vanilla flavor. If you can’t find fresh beans, use 2 teaspoons of pure vanilla extract, but add it after you remove the mixture from heat. Fresh bean is worth the extra effort, though.
Unflavored gelatin (2 teaspoons / 7g) — This is what sets the panna cotta. Bloom it in cold water first. Don’t skip this step, or it won’t dissolve properly. I use Knox gelatin because it’s reliable and easy to find. Agar-agar is a vegan alternative, but the texture is different (chewier), so I stick to gelatin.
For the Berry Compote
Mixed berries (2 cups / 300g) — I use a mix of raspberries, blackberries, and strawberries. Raspberries are tangy, blackberries are deep, and strawberries are sweet. It creates a complex flavor. Frozen berries work too—just thaw them first and drain the excess liquid.
Granulated sugar (2 tablespoons / 25g) — To sweeten the berries. Adjust based on how tart your berries are. If they’re super tart, add a bit more.
Fresh lemon juice (1 tablespoon / 15ml) — This brightens the berries and cuts through the richness of the cream. It’s essential for balance. Don’t skip it.
Water (2 tablespoons / 30ml) — Helps the sugar dissolve and creates a sauce-like consistency. You can use less if you want a thicker compote.
Optional: Fresh mint leaves — For garnish. It adds a pop of color and a fresh aroma. I always have mint in my garden, so I use it. If you don’t, it’s fine to skip.
Equipment Needed
You don’t need fancy equipment for this. Here’s what I actually use. If you don’t have everything, don’t worry. There are alternatives.
Saucepan — A medium-sized saucepan works best. I use a 2-quart pot. It needs to be wide enough to let the cream heat evenly. Stainless steel is great because it doesn’t react with the acid in the berries or gelatin.
Small bowl — For blooming the gelatin. Any small bowl will do. I keep a specific one for this.
Whisk — For stirring the cream and dissolving the sugar. A silicone whisk is nice because it doesn’t scratch the pot.
Mold or ramekins — This is where you serve the panna cotta. I use small ramekins (about 6 ounces each) because they’re easy to handle and look elegant. You can also use muffin tins, or even individual glass jars. Just make sure they’re heat-safe if you’re using a water bath (which we aren’t, so regular glass is fine).
Strainer — Optional, but I like to strain the cream mixture before pouring it into the molds to remove any undissolved gelatin clumps or vanilla bean strings. It ensures a perfectly smooth texture.
Knife and cutting board — For slicing the berries if you’re using large strawberries.
Measuring cups and spoons — Standard stuff. Accuracy matters here, especially with the gelatin.
How to Make It: Step-by-Step
Alright, let’s make this! I’m walking you through exactly how I do it, including the little tricks I’ve picked up over the years. It’s simple, but there are a few key moments to watch.
Step 1: Bloom the Gelatin (5 minutes)
Start by sprinkling the gelatin over ¼ cup of cold water in a small bowl. Let it sit for 5-10 minutes. It will turn into a spongy, jelly-like mass. This is called “blooming.” It hydrates the gelatin so it dissolves smoothly later. Don’t skip this, or you’ll get rubbery bits in your panna cotta.
Step 2: Heat the Cream Mixture (5-7 minutes)
In your saucepan, combine the heavy cream, whole milk, sugar, and the scraped seeds from the vanilla bean (plus the pod itself). Heat over medium-low heat, stirring constantly. You want to warm the mixture until the sugar is dissolved and it’s hot to the touch, but NOT boiling. Boiling can ruin the gelatin’s setting power. If you boil it, let it cool slightly before adding the gelatin.
Step 3: Dissolve the Gelatin (2 minutes)
Remove the saucepan from heat. Take the bloomed gelatin and squeeze out any excess water. Add it to the warm cream mixture. Whisk vigorously for 1-2 minutes until the gelatin is completely dissolved. It should disappear. If you see any clumps, strain the mixture through a fine-mesh sieve into a jug or large measuring cup.
Step 4: Pour and Chill (4-24 hours)
Pour the mixture into your ramekins or molds. Cover them with plastic wrap or lids. Place them in the fridge. They need to chill for at least 4 hours, but overnight is best. The longer they chill, the firmer they set. I usually make them the day before I need them.
Step 5: Make the Berry Compote (10 minutes)
While the panna cotta chills, make the compote. In a small saucepan, combine the berries, sugar, lemon juice, and water. Heat over medium heat, stirring occasionally. Let it simmer for 5-7 minutes until the berries break down and the mixture thickens slightly. It will be saucy, not jam-like. Remove from heat and let it cool to room temperature. You can serve it warm, but room temp is better for contrast with the cold panna cotta.
Step 6: Assemble and Serve
To serve, spoon the berry compote over the chilled panna cotta. Garnish with a mint leaf if you have it. Eat immediately. The compote will start to soften the panna cotta if you let it sit too long, so serve it right away.
Total Time: About 20 minutes active, plus 4+ hours chilling.
Expert Tips & Tricks
Here’s everything I’ve learned from making this dozens of times. These tips will save you from my mistakes.
Don’t Boil the Cream
I can’t stress this enough. High heat damages gelatin. If you boil the cream, your panna cotta might not set, or it might become grainy. Keep the heat low and steady. Warm is perfect.
Use Fresh Vanilla Beans
Vanilla extract works, but fresh beans give you that beautiful speckled look and a deeper, more complex flavor. It’s worth the extra cost and effort. If you use extract, add it after you remove the mixture from heat to preserve the flavor.
Strain for Smoothness
Even if you think you dissolved the gelatin, strain the mixture. It takes 30 seconds and guarantees a silky smooth texture. No one wants a rubbery bit in their dessert.
Make Ahead is Key
Don’t try to make this on the day of your party. Make it 24-48 hours ahead. The flavors improve with time. The vanilla mellows, and the texture becomes more uniform.
Compote Consistency
The compote should be loose enough to spoon but thick enough to cling to the panna cotta. If it’s too thin, simmer it longer. If it’s too thick, add a splash of water. It should look glossy and vibrant.
Variations & Substitutions
Once you’ve nailed the basic version, here’s how you can mix it up. I’ve tried all of these.
Lemon Panna Cotta
Skip the vanilla bean and add the zest of 2 lemons to the cream mixture. Add 2 tablespoons of lemon juice to the compote instead of berries. It’s bright and refreshing.
Chocolate Panna Cotta
Add ½ cup of chopped dark chocolate to the warm cream mixture. Stir until melted. Top with raspberry compote. It’s rich and decadent.
Coconut Panna Cotta
Swap the heavy cream and milk for full-fat coconut milk. Use coconut extract instead of vanilla. Top with mango compote. It’s dairy-free and tropical.
Earl Grey Tea Panna Cotta
Steep 2 Earl Grey tea bags in the warm cream mixture for 10 minutes, then remove the bags. It has a lovely floral and bergamot flavor.
Dietary Modifications
Vegan: Use agar-agar instead of gelatin. Follow the package directions, as agar sets differently. Use coconut milk instead of dairy cream. The texture will be slightly chewier but still delicious.
Gluten-Free: This recipe is naturally gluten-free. Just make sure your gelatin and berries are certified gluten-free if you’re sensitive.
Lower Sugar: Use a sugar substitute like erythritol or stevia. Note that sugar also helps with texture, so the panna cotta might be slightly softer. Use less sugar in the compote too.
Serving & Storage
How to Serve: I usually serve these in the ramekins they’re chilled in. It looks rustic and elegant. But you can also unmold them onto plates for a more formal presentation. To unmold, dip the bottom of the ramekin in hot water for 10 seconds, then flip it onto a plate. Tap gently, and it should slide out.
Side Dishes: This dessert stands alone. It’s light enough that it doesn’t need anything else. But if you want a drink pairing, I love a crisp Pinot Grigio or a sparkling rosé. For a non-alcoholic option, try my Labor Day Watermelon Mint Agua Fresca. The refreshing mint and watermelon cut through the richness of the cream perfectly.
Storage: Store the panna cotta in the fridge, covered, for up to 5 days. The compote can be stored in a separate container in the fridge for up to 3 days. Reheat the compote gently before serving if you want it warm.
Freezing: Panna cotta does not freeze well. The texture changes and becomes grainy. Make it fresh or store in the fridge. If you’re meal prepping, stick to the fridge.
Nutrition Information
I’m not a nutritionist, but here’s the breakdown if you’re tracking. This is a rich dessert, so portion control is key.
Per Serving (based on 6 servings):
- Calories: 280
- Protein: 4g
- Carbs: 22g
- Fiber: 1g
- Sugar: 20g
- Fat: 18g
- Saturated Fat: 11g
- Cholesterol: 60mg
- Sodium: 45mg
What’s Good: It’s naturally gluten-free. The berries add some antioxidants and vitamin C.
What to Know: It’s high in fat and sugar due to the cream and compote. If you’re watching your intake, stick to one small ramekin. Pair it with a light activity or a morning after.
Final Thoughts
So that’s my go-to vanilla bean panna cotta with berry compote. It’s simple, it’s elegant, and it’s reliable. I’ve made it for everything from casual brunches to formal dinners, and it never fails to impress. It’s the dessert I reach for when I want to treat myself or my guests without the stress.
Make it yours! Try different berries, different extracts, different moods. The best recipes are the ones you adapt to your taste. And remember, the key is in the make-ahead. Let the flavors meld, and you’ll be rewarded with something truly special.
If you make this, drop a comment and let me know what you think! I love hearing how recipes turn out in your kitchen. And if something doesn’t work, tell me that too—I’m here to help troubleshoot.
Happy cooking! And I hope your kitchen smells half as good as mine does right now.
Frequently Asked Questions
Can I use gelatin sheets instead of powder?
Yes, you can. One teaspoon of powder is roughly equivalent to one sheet. Bloom the sheets in cold water, squeeze out the water, and add them to the warm cream. The process is the same, just a slightly different preparation.
Why did my panna cotta not set?
Usually, this means the gelatin was damaged by boiling the cream, or you didn’t use enough gelatin. If you boiled the cream, the gelatin lost its setting power. If you used too little, it’s just too soft. Next time, measure carefully and keep the heat low.
Can I make this in a large mold instead of ramekins?
Yes, but the chilling time will be longer. A large mold might take 6-8 hours to set fully. Make sure to check it with a knife test (it should jiggle slightly but not be liquid).
Can I use frozen berries for the compote?
Yes, frozen berries work great. Just thaw them first and drain the excess liquid. You might need to simmer the compote longer to reduce the extra water. The flavor is often more intense with frozen berries.
How do I unmold the panna cotta?
Dip the bottom of the ramekin in hot water for 10-15 seconds. Dry the outside, place your plate on top, and flip it quickly. Tap gently, and it should slide out. If it sticks, try the hot water trick again for a few more seconds.
Can I make this dairy-free?
You can use coconut milk instead of cream and milk. Use agar-agar instead of gelatin for a vegan set. The texture will be slightly different, but it’s still delicious and creamy.
What if I don’t have a vanilla bean?
Use 2 teaspoons of pure vanilla extract. Add it after you remove the cream mixture from heat. It won’t have the speckled look, but the flavor will be excellent.
Pin This Recipe!
Vanilla Bean Panna Cotta: Best Easy Elegant Dessert
- Total Time: 4 hours 30 minutes
- Yield: 6 servings 1x
Description
A silky, elegant, and make-ahead dessert featuring creamy vanilla bean panna cotta paired with a bright, tangy berry compote. This gluten-free recipe requires no baking and looks restaurant-quality.
Ingredients
- 2 cups heavy cream
- 1 cup whole milk
- 1/2 cup granulated sugar
- 1 whole vanilla bean (seeds scraped, pod included)
- 2 teaspoons unflavored gelatin
- 1/4 cup cold water (for blooming gelatin)
- 2 cups mixed berries (raspberries, blackberries, strawberries)
- 2 tablespoons granulated sugar (for compote)
- 1 tablespoon fresh lemon juice
- 2 tablespoons water (for compote)
- Fresh mint leaves (optional, for garnish)
Instructions
- Bloom the gelatin: Sprinkle gelatin over 1/4 cup cold water in a small bowl and let sit for 5-10 minutes until spongy.
- Heat the cream mixture: In a saucepan, combine heavy cream, whole milk, 1/2 cup sugar, and vanilla bean seeds/pod. Heat over medium-low, stirring constantly, until sugar dissolves and mixture is hot but NOT boiling.
- Dissolve the gelatin: Remove saucepan from heat. Squeeze excess water from bloomed gelatin and add to warm cream. Whisk vigorously for 1-2 minutes until completely dissolved. Strain mixture if needed to remove clumps.
- Pour and chill: Pour mixture into ramekins or molds. Cover and refrigerate for at least 4 hours, preferably overnight, until set.
- Make the berry compote: While panna cotta chills, combine berries, 2 tablespoons sugar, lemon juice, and 2 tablespoons water in a small saucepan. Heat over medium, simmering for 5-7 minutes until berries break down and mixture thickens slightly. Cool to room temperature.
- Assemble and serve: Spoon berry compote over chilled panna cotta. Garnish with mint if desired. Serve immediately.
Notes
Do not boil the cream mixture as high heat damages gelatin. For best results, make the panna cotta 24-48 hours ahead to allow flavors to meld. If using vanilla extract instead of beans, add 2 teaspoons after removing from heat. Panna cotta does not freeze well; store in the fridge for up to 5 days.
- Prep Time: 15 minutes
- Cook Time: 15 minutes
- Category: Dessert
- Cuisine: Italian
Nutrition
- Serving Size: 1 ramekin with compo
- Calories: 280
- Sugar: 20
- Sodium: 45
- Fat: 18
- Saturated Fat: 11
- Carbohydrates: 22
- Fiber: 1
- Protein: 4
Keywords: vanilla bean panna cotta, berry compote, make ahead dessert, gluten-free dessert, elegant dessert, no bake dessert, easy panna cotta